home >> raster editing >
> simple sphere | Mars | spheroid | blue sphere | Viagra
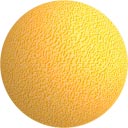
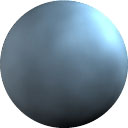
This nicely illuminated sphere was created in the Mac version 5 of Painter (a.k.a. Fractal Design Painter, MetaCreations Painter, and now Corel Painter), using the steps listed below.
This procedure is easier than it looks, and takes about 5 minutes or less if you are familiar with Painter, otherwise the first time may take up to 15 minutes, or longer if you keep experimenting with your surface.
Create a fractal surface pattern. In the Art Materials palette, under the Pattern menu, choose Make Fractal Pattern. Leave Channel set to Height as Luminance, and adjust other settings as desired. When the preview looks like an interesting grayscale surface, click OK and let Painter generate the fractal pattern.
In the Effects menu, under Surface Control, choose Apply Lighting. Use the settings to aim one light (of any color, the sphere should take on this lighting color in next step) at a corner of your square image so it brightens up the corner. Adjust settings as desired, then click OK.
Also in the Effects menu, under Surface Control, choose Quick Warp to create the spherical object from your illuminated texture. In the dialog box, click the Sphere button. Set Power to 2.0, set Angle Factor to 0.5, and click OK.
To complete the image, erase the background. Using the round selection tool (click and hold on selection tool to choose shape), select exactly from one corner to the opposite corner to enclose the round part of your image. Under the Select menu, choose Invert. Then go to the Edit menu and choose Clear.
Remove the selection (Command-D) and there it is!
I find that using a colored light on a grayscale surface yields an image that looks like a colored object, with more realistic lighting than I would get from a colored surface with white light.
If you feel adventurous, you can experiment with the Effects menu to alter the contrast, color, or appearance of the surface right after generating the fractal pattern, before applying the lighting effect. You can reduce the contrast to make a more ordinary surface, or in the Effects menu, under Surface Control, choose Apply Surface Texture (next to Using, select Image Luminance) to create a relief-map texture for a planet. Experiment with different settings and see what you come up with.
Remember that you could use this technique with any surface you want. For example, you could start with a water surface from a stock photo, fill your image area with a pattern (in Painter, the Art Materials palette has weaves, patterns, and paper textures which can be used), or paint your own surface from scratch (Painter is especially good for doing this). Then use the same lighting and warping steps as above, and remove everything outside your sphere to finish it.
Here is another example that was created using the same steps as above, employing the same lighting technique on a different (colored and pitted) texture, with less contrast. The result is a small, round orange.